Chocolate Cake with Matcha Buttercream
I've always wanted to make a cake! Yes, you read that correctly. I might be a great macaron baker but not a cake maker! I was recently reading through my Butter Baked Goods cookbook and came across their recipe for making a chocolate cake and it looked really good. Now, having owned the cookbook for a while, I have often flipped through the cookbook thinking about how I really should just bake a cake. So, I finally decided to take the plunge.
While their chocolate cake recipe used chocolate buttercream, I wanted to make a cake using the matcha powder my in-laws had given me recently. So last weekend, I set out to attempt to bake my first 4 layered chocolate cake with matcha buttercream.
 |
| Ingredients assembled for chocolate cake making |
 |
 |
| The making of the chocolate cake |
 |
| Cake pan buttered and floured |
 |
| Chocolate cake batter being poured into the cake pan |
 |
Chocolate Cake cooling on the wire rack
|
I let the cakes cool for about 3 hours until they were no longer warm. The recipe actually doesn't mention how much time to cool the cakes, but in retrospect I think the longer the better. This would prevent the cake from being too soft and squishy to cut. The recipe mentions cutting the cakes in half prior to icing, but I wanted my cake to be more level so I cut the tops off each cake. Funny enough, we forgot that we didn't have a turning cake stand, so Dan made one for me. It seemed to do the trick! Using a serrated knife, I gently scored the parts I wanted by keeping the knife leveled while turning the cake. This helped me evenly cut the top of the cake off. I did the same to the other cake. Then, I cut each cake horizontally in half for a total of 4 layers.


- 2 Tbsp Matcha Powder
- 2 Tablespoon of hot water to dissolve powder
- 160g (approx. 1 cup) superfine sugar
- 50g water
- 2 whole egg
- 2 egg yolk
- 360g soft unsalted butter (cut into cubes)
- Candy Thermometer for measuring

Matcha Buttercream Directions
- Bring sugar and water to a boil in a small pot. Heat the sugar to 250F(120C) using a candy thermometer. If it boils, clean the sides of the pan with a damp pastry brush. Try not to mix the solution, but allow it to heat on its own.
- In another bowl or the bowl of your Kitchen Aid whisk the eggs and egg yolks until it lightens in colour.

- Once the hot sugar mixture reaches 250F pour it immediately into the whisking egg mixture. Then, increase to a higher whisking speed. Continue whisking until the mixture has cooled down completely. It will start to look like a meringue and be glossy.

- Keep whisking the meringue until it has cooled. Meanwhile, cream then whisk the butter until it has thickened.
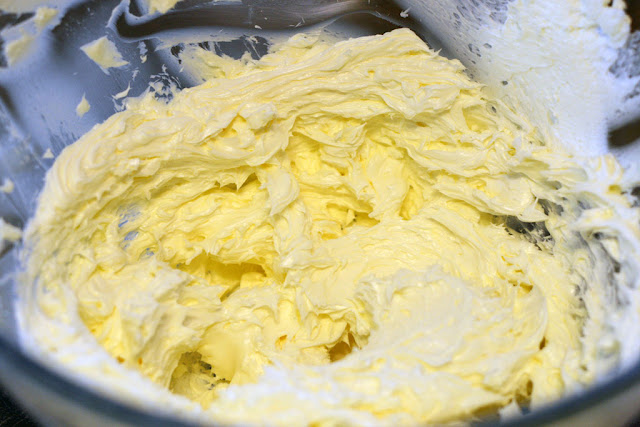
- Once the meringue has cooled, slowly add the whisked butter slowly into the meringue. Continue whisking until the buttercream is smooth.

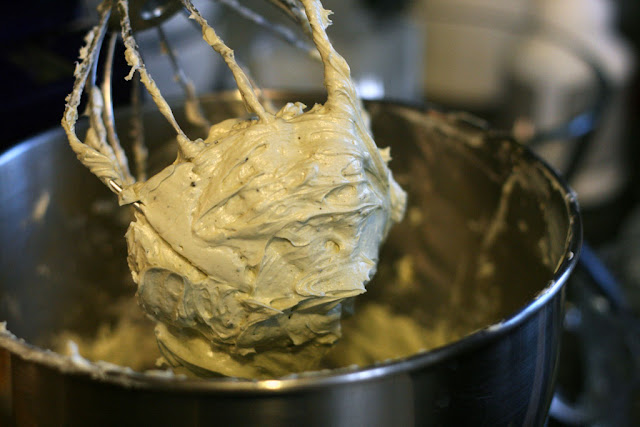
- Dissolve the matcha powder in the hot water. Mix well until it forms a thick paste.
- Slowly add the matcha paste (when cool) to the buttercream while mixing at low speed.
- Once everything is combined and looks like buttercream (1-2 minutes); switch to the paddle attachment. Beat on low speed for a minute in order to eliminate air bubbles.
- Scrape down the sides of the bowl with a spatula. Continue beating until the buttercream is smooth.


notes:
- You can dissolve the matcha powder in up to 2 tbsp of water, but I found that this took longer for the buttercream to set as it was more wet. It's also important to allow the dissolved matcha powder solution to cool before adding to the buttercream.
- Superfine sugar (also known as berry sugar) can be made by taking granulated sugar and processing in a food processor.
Cake Assembly
So here we are, at the final stage of the cake assembly! Thinking ahead about how to transfer the iced cake onto a plate, Dan cut me a piece of parchment paper that was a little bigger than the diameter of the cake. I placed the best looking even cake layer that I had to start on the bottom (as that would be the bottom layer that would support the rest of the cake). Then, I proceeded to make the 'crumb coat' for the cake in order to prevent any crumbs from showing up on the very top layer of the cake. I spread matcha buttercream onto the first layer of the cake using the turn table to help me get evenly across.
So here we are, at the final stage of the cake assembly! Thinking ahead about how to transfer the iced cake onto a plate, Dan cut me a piece of parchment paper that was a little bigger than the diameter of the cake. I placed the best looking even cake layer that I had to start on the bottom (as that would be the bottom layer that would support the rest of the cake). Then, I proceeded to make the 'crumb coat' for the cake in order to prevent any crumbs from showing up on the very top layer of the cake. I spread matcha buttercream onto the first layer of the cake using the turn table to help me get evenly across.

 |
| First layer iced with the matcha buttercream |
I used the same process with the remaining 2 layers of cake. At the very end, I thinly coated the top and sides with the matcha buttercream leaving a sizeable amount for icing the rest of the cake later. The recipe calls for setting the cake for 15 minutes, but on the day I assembled the cake it was fairly warm in the condo and, as a result, my buttercream was starting to get soft and melty. So, I decided to place the cake and the remaining buttercream in the fridge overnight and then finish icing the cake the next day.
 |
| Chocolate Cake iced with the "crumb layer" |
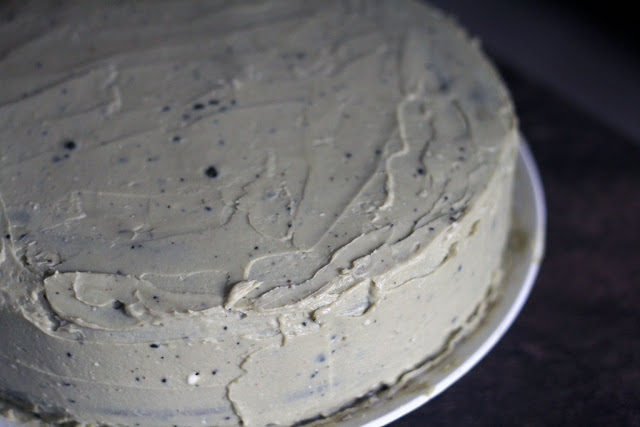
The following day, I finished applying the top coat of the chocolate cake. I started with the sides of the cake first and then finished with the top.
 |
| The finished chocolate cake with matcha buttercream between each layer and on top! |

Here are some tricks I learned about from my followers on Instagram (@beyondumami) that I will definitely use for next time:
- Chilling the cakes in the fridge for 1-2 hours prior to slicing and icing would likely have made it much easier for me to cut (thanks FoodGypsy!)
- I wasn't too worried about the moisture in this cake as it is so moist and soft, but if I am ever worried about the cake drying out, I can brush the layers with a simple syrup before icing. This helps to keep the cake moist for longer.
- Lesley at Instaneko suggested using a cutting tool from ikea in order to evenly slice the cake.
- Helen over at Lostsock mentioned that I could also use unflavoured dental floss to cut the cake horizontally. I did see some youtube videos about using this method too!
- Darci over @theinfiniteyums suggested getting a $12.99 lazy susan from ikea for icing the cake.
I would definitely make this cake again, even using the recipe for making cupcakes. The addition of cocoa powder into the 2 cups of coffee certainly helps with the taste and also the moisture of this cake. My matcha buttercream (which is the same that I use for my matcha macarons) went surprisingly well and balanced the chocolate flavours in every bite. Making cake was much easier than I thought it would be. I always thought it was a complicated and daunting task, but if you can make macarons (or make brownies, cookies, etc.), you definitely can make this cake! The only problem is finding enough people to share this large cake with, but that's a good problem to have!

I am giving away a copy of Butter Baked Goods to my Alberta-based readers! You MUST be able to meet with me in Edmonton or Calgary (for Calgary, it's specifically the May long weekend, May 20-23, 2016).
The giveaway opens on May 8, 2016 and will close at 12am Friday May 20, 2016. I'll email the winner in the afternoon of Friday May 20. Use the Rafflecopter widget to help track your mandatory entry and to also get additional entries! Also, I have changed the settings so you can comment as a guest! Just click on "name", more boxes with appear. On the very bottom left corner there is a checkbox that says "I'd rather post as a guest". Then, you can comment without having to use the Disqus part! Good luck and thanks for visiting!
The giveaway opens on May 8, 2016 and will close at 12am Friday May 20, 2016. I'll email the winner in the afternoon of Friday May 20. Use the Rafflecopter widget to help track your mandatory entry and to also get additional entries! Also, I have changed the settings so you can comment as a guest! Just click on "name", more boxes with appear. On the very bottom left corner there is a checkbox that says "I'd rather post as a guest". Then, you can comment without having to use the Disqus part! Good luck and thanks for visiting!

This looks amazing! I had some left over red wine once and made red wine chocolate cakd. Surprisingly good! But my go to is always guiness chocolate cake with a light layer of cream cheese icing :)
ReplyDeleteYes! it was a very delicious cake! There is coffee mixed into the cake batter as well! That is why it is so moist and flavourful!
ReplyDeleteThe Guiness chocolate cake sounds pretty good too! I guess I should try baking that one day too! Yes, a thin layer of icing is what I'm going for lately too. Too much buttercream or icing and no one wants to eat it.
My favorite is chocolate cake with white buttercream icing but really I've never met any cake I didn't like!
ReplyDeleteCake looks amazing. Need to up my baking skills.
ReplyDeleteA one bowl chocolate cake is my go-to, it's a quick reliable recipe thats always delicious
ReplyDeleteMm I think any type of chocolate is perfect in my books! :) if you like chocolate you would love this recipe!
ReplyDeleteI must admit my baking skills aren't great for cakes! But the butter recipe makes it so easy! :) you would do just great!
ReplyDeleteOh that sounds great too! Do you put a topping on it?
ReplyDeleteDefinitely, I usually add some sort of icing
ReplyDeleteWay to go! I think it's much easier to make a good chocolate cake than it is to make a good white or yellow cake, although I am getting pretty good at the latter. All the best!
ReplyDeleteLooks awesome! I have yet to attempt baking cakes. Like you before this, I don't own any cake pans. All my cake making were done in mugs or bowls heh.
ReplyDeleteMy favorite cakes are usually the fluffy spongey ones and not super sweet.
Thanks :) I have yet to try making a yellow cake; though I am a bit partial to chocolate.
ReplyDeleteDefinitely worth trying your hand at this then :) the cake pan wasn't too much money so you could buy one too! Oh angel cakes are good! Have you tried making that?
ReplyDeleteI don't bake my own cakes (unless from a box) but I love the Duke from Duchess. The salted caramel layer just gets me.
ReplyDeleteI like carrot cake
ReplyDeleteawesome! I do love the duke too. Don't worry, with this cookbook it's not JUSt cakes! They also have muffins, squares and others! :)
ReplyDeleteI'm not as big of a fun for carrot cake. probalby because I ate too much of it when I was young!
ReplyDeleteThe internet is an enormous place to start searching for your next vacation. But it's a great place to look if you know where to go. Finding the best travel guides out there can be quite a chore, but with a little help, there are ways of finding the very best that's out there.
ReplyDeletehttps://explorewaves.com/best-restaurants-in-lahore/