Danprime's Scratch Ramen Noodle Recipe Revisited

Comparing ramen is difficult because it is extremely subjective. More importantly, ramen is one of those penultimate comfort foods because of memories attached with eating it. Ramen is not just any noodle, it's the noodle that someone ate when they were hanging out with friends, it's the noodle bowl from that place your parents took you to when you were young and you didn't understand the menu but you were able to point to a specific bowl. In addition to dealing with memories there are so many different types, styles, and interpretations to ramen. When I'm testing ramen, I'm not trying to determine which one is better but which one is closer. Closer to the one I'm trying to manifest from a texture, flavour, chewyness I have in my mind rather than replicate a noodle I've eaten.
 |
| One of my very first memories of ramen-like noodles is this instant noodles from a brand called Mama. At the time, I didn't know about words like al dente or umami, daily recommended sodium intake, I just knew that it was good! What was the first noodle you ate? |

We posted our ramen noodle recipe and writeup a while ago and I have been tweaking the "winning" recipe and adjusting my recipe based on feedback and lots of testing. Since there have been multiple revisions (8 so far!), this post will be about my current (2016) homemade ramen noodle recipe and what I've done to get there.
What distinguishes ramen noodles from other noodles (e.g. pasta, rice noodles, Japanese udon) is that they are alkaline (the opposite of being acidic) whereas other noodles have no added alkalinity. Increasing alkalinity of the noodle dough makes the noodles "slippery" and chewy with a slight yellow tint.
 |
| Danprime's ramen noodle version 8 |
 |
| My noodle recipe (revision 8) on the left, a ramen recipe from norecipes.com on the right. |
 |
| I'm not the only one to make several iterations of ramen noodle recipe, here are two from http://notsoancientchinesecrets.com |
- Elasticity / Springiness / Chewiness - how quickly the cooked noodle tries to return to it's shape after it's been deformed
- Tensile Strength - the force required to break a cooked noodle
- Flavour - Ramen noodles are characteristically alkaline (opposite of acidic) which imparts what some people describe as a soap-like flavour. If you want a strong example of alkaline noodes, try eating some wonton-noodles.
- Liquid Adsorption - how well it carries the soup or broth as you eat the noodle (little adsorption means you don't get much of the soup when you eat the noodles, high adsorption means you taste a lot more of the soup or broth as you eat/slurp your noodles).

The ramen recipe we posted is a great starting point because it was a very repeatable recipe. However, it was pointed out to me that the alkalinity of the noodles was quite strong, almost over-powering the more subtle flavours of the flour. I had been testing so many iterations to the point that I didn't notice how alkaline it was until it was pointed out. This resulted in several iterations where I tried to reduce the alkalinity but maintain the chewyness. When you reduce the alkalinity in noodles, you tend to get softer (less elastic / chewy) noodles. So this recipe balances the alkalinity and chewyness that I'm looking for.
 |
| Danprime's Ramen Noodle Version 8 |
Homemade Ramen Noodle Recipe (version 8)
Ingredients
- 240g of All Purpose Flour (I used the NoName brand from Loblaws/Superstore/No Frills)
- 60g of bread flour (not the whole-wheat kind, just regular bread flour)
- 10g of dried gluten powder (Bulkbarn)
- 3g of kansui (also known as lye water bought at T&T)
- 137g of room temperature water (22 C) separated into half-cup (125g) and remainder less than a tablespoon (12g)
 |
| Toppings for ramen. |
Equipment
- KitchenAid Stand Mixer
- Mixing bowl
- Pasta roller with noodle cutter
Yield
4-6 servings
Time
4 hoursInstructions
- Put all dry ingredients in mixing bowl of KitchenAid stand mixer and turn on machine at speed level 4 for a few minutes.
- Mix kansui into 125g (half cup) of water
- Lower the stand mixer's speed to second lowest setting
- Slowly pour kansui + water solution into mixing bowl while the stand mixer is still mixing.
- The flour should start to clump together like wet sand or brown sugar but is still relatively loose.
- Add remaining water and the flour should now form little nuggets, if it's still powdery-sand-like slowly add water in teaspoon increments until the one or two nuggets form.
- Stop mixer and start kneading the dough inside the bowl. I find it easier inside the bowl as it keeps everything together
- Knead for 15 minutes until a solid mass of dough is formed
- Transfer dough to table (note that you shouldn't really need to use a lot of extra flour at this point), continue to knead for another 5-8 minutes. Dough should really be resistant to kneading at this point.
- Wrap in food wrap and place dough ball in the fridge for around 3 hours. I used to leave it overnight but I have found that it didn't make that much of a difference.
- Setup pasta roller to be at the largest setting
- Divide into 8 smaller balls (i.e. divide into half, divide each half into halves, and divide those halves into another halve). If you're doubling the recipe, divide into 16 balls.
- Flatten each ball a bit with your hand before you roll through the pasta roller
- The first setting may require several passes. You are looking for a smooth sheet of dough to come out of the roller, no jagged edges or shaggy dough.
- After the first pass, let the sheet of dough rest on the table for around 5 minutes (you can use this time to work on another ball). This is to let the dough rest a bit. If you are too aggressive in thinning out your dough you will lose some of the elasticity. At this point, you can start using flour to prevent the dough from sticking
- After the first pass, decrease the thinness and run it through at least twice each setting, always letting the dough rest for a few minutes between each setting.
- Continue to decrease the thinness until you are at level 7 and let the dough rest for a few minutes.
- Cut the sheet dough using the pasta cutter (liberally dust the cut noodles with flour).
Cooking the Noodles
- With salted water at a vigorous boil, throw two sheets worth of noodles into the water and cook for 100 seconds
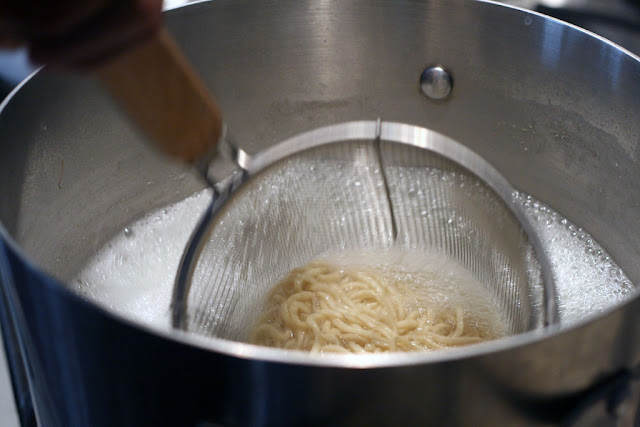
Using a wire mesh strainer helps keep the noodles contained. - Take noodles out and lightly rinse the noodles in cold water to shock and stop them from cooking.
- Serve with your favourite broth.

Timing is everything with cooking homemade ramen noodles but you'll want to keep your broth near boiling so that your ramen bowl is nice and hot. - Enjoy!


With this iteration, I managed to reduce the alkalinity without sacrificing the chewyness. This was done by adding extra gluten via both powder form and adding of bread flour. While some homemade ramen noodles call for salt, I find that the salt is used to counter the kansui and with higher kansui, you actually get less broth adsorption. The kansui literally makes the noodles more slippery and makes it harder to carry the flavour of the soup into your mouth.

I don't believe that this will be the end-all recipe for ramen noodles but I'm quite happy with this version, it balances the flavour, and chewyness I'm looking for.
What's your favourite noodle memory?
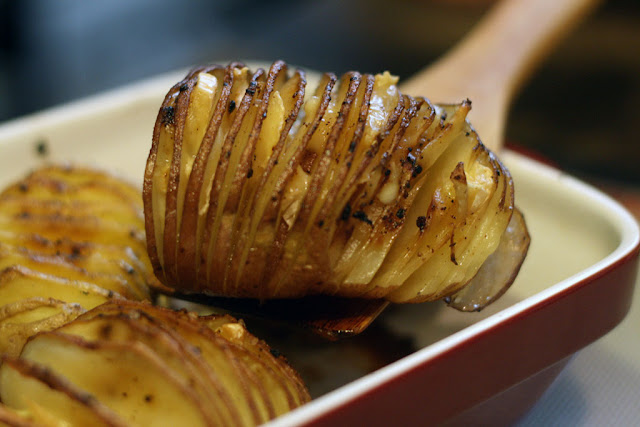

I love the way you dig down into your process in this post. I think people often underestimate the work that goes into finding the perfect iteration of something like this. The last photo, especially, is making me want to abandon my food plans for the day and go out for ramen instead!
ReplyDeleteso what happens if you add gluten and more lye? should it be even chewyer? And as i live in Germany, what can i replace the bread flour with and the all purpose (which probably is 405 here) is also not quiet the same, you think it will make a big different if i just use the finest flour i can find and just use that? or maybe add some rye flour instead of bread flour?
ReplyDeleteyes, i love that too!
ReplyDeleteI would use all purpose flour or whatever similar all purpose flour is there. definitely do not use rye flour. Rye flour is super dry and uses up a lot of moisture.
ReplyDeletewhat types of flours are in germany?? perhaps we can figure out which one to use from the options! feel free to send us the photos too! beyondumami@gmail.com
Can you please explain to me why you use both all purpose flour & bread flour? Most recipes use only the bread flour.
ReplyDeleteThe two flours have different amounts of protein and gluten strength. Some early research showed that flours vary across different brands and different regions. For example, in some countries all purpose flour will have very low gluten (9% or lower) and others can be pretty high (11% or more).
ReplyDeleteI(Dan) tried batches with 100% all purpose and 100% bread flour and they didn't result in what I was looking for (some noodles were way too hard to mix and cut, others just didn't hold together after cooking) . Only mixing the flours did I get the noodle I wanted.
You should try a batch with only bread flour and compare it with the mix and report back your result! :)
-Dan
Thank you very much for your reply. I bought a noodle maker & have tried a few recipes with bread flour. Sad to say I didn't get the results I wanted. I came across your site & was impressed by what you have done to arrive at the recipe. I followed your recipe but used only 125 ml of water instead of 137. I think noodle maker needs lesser water. I must say that this is the BEST noodle I made so far😋. A million thanks to you.
ReplyDeleteThat's great to hear!! Using less water makes sense as we usually make it in a (open air) stand mixer and our climate (Edmonton, Canada) is definitely drier.
ReplyDelete-Dan
Im using 550 as Bread flour, works great.. I think all purpose flour is kinda like 405 and bread flour something in between 550 and 1050
ReplyDelete