Vitamix Blender Lemon Cream Pie (Gluten Free)
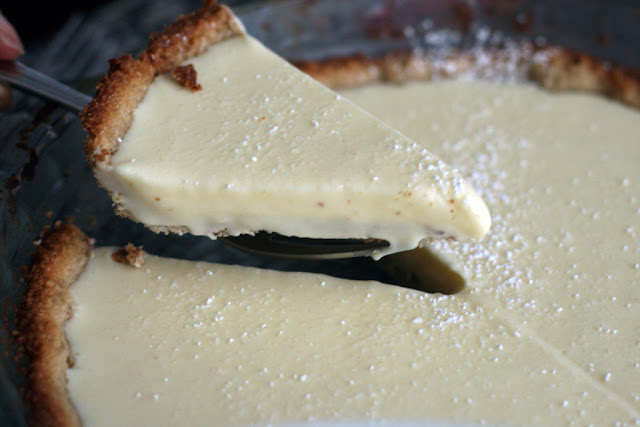
I have been meaning to write my recipe for this blender lemon cream pie for a while! After much testing, sampling, and testing some more I present to you this deliciously creamy yet simple to make gluten free lemon cream pie made in the Vitamix! Okay, so the gluten free pie crust isn't made in the Vitamix, but I did use it to blend up the gluten free oats into a fine flour. The beauty of the recipe is that you get a very creamy, lemony filling and you don't need a double-boiler at all.
To start, make the gluten free pie dough. After it is assembled, wrap up the dough in plastic wrap and refrigerate for approximately 1 hour. Just remember that this pie dough recipe makes a double batch so you can fridge or freeze the other half for another baking project. About 15 minutes before you are going to roll out the pie dough, take it out of the fridge and place on the counter top so it can come to room temperature. It is ready to use when you can push your finger into the dough and there is a bit of resistance.
While the dough is in the fridge, assemble your ingredients for making the blender lemon cream. You will need the following ingredients and a thermometer:
Ingredients for Blender Lemon Cream
- 100g (less than 1/2 cup) sugar
- 2 tablespoons of lemon zest (approx. one large lemon)
- 90g lemon juice
- 2 large eggs
- 150g (less than 3/4 cup) unsalted butter- cubed; room temperature
- Place the lemon zest and sugar in a bowl. Gently rub the lemon zest into the sugar to make lemon sugar.

- Transfer the lemon sugar into the Vitamix or a high powered blender and blend for a few seconds. Just enough until it combines together.

- Add in the eggs; blitz for a few seconds. Then add in the lemon juice.

- Switch to the hot soup function on the Vitamix and blend until the mixtures reaches a temperature of 167F. This will take approximately 5-7 minutes. Use a digital thermometer to check the temperature periodically. You will know it is done when the mixture has thickened. Once the mixture reaches 167F, slowly add in the cubed butter. When combined, place the entire container in the fridge to cool.

- Because you are working with gluten free ingredients, the pie dough will stick more compared to using flour. The best stress and mess free method is to first lay down a sheet of plastic wrap on the counter. Then, sprinkle the rice flour (which you can get from most major grocery stores) on the surface and roll the pie dough out on top of the plastic wrap. To figure out how thin you should roll the pie dough, flip over your pie dish to estimate. There should be approximately an inch or two bigger than the pie dish. We rolled our pie dough out to a thickness of around half an inch.

- To transfer the pie dough to the pie dish, slide the saran wrap onto a flat cutting board. Place your buttered pie dish, in the center, on top of the rolled out pie dough .

- Flip it all over and your pie dough should now gently fall into the pie dish. Take off the cutting board and using the the palm of your hand gently flatten the pie dough into the dish. Use a knife to cut away any excess pie dough from the edges.

- Make the edges of your pie. I typically struggle with this part, so if it doesn't look perfect don't worry too much about it! You get better with practice. Essentially, you want to gently push down the edges of the dough and make a ridge. Afterwards, use a fork to make some vents on the bottom of the pie. Because we made this recipe several times prior to blogging this recipe, the picture below is Dan's work of art! My work on the pie edge is more rustic as you can see in the first photo on this blog post.

- This pie crust needs to be blind baked first as there is no other baking needed after the lemon cream is poured into the crust. To blind bake the crust, lay parchment paper on top of the crust. Then pour baking beans on top to weigh it down.

- Bake at 375F for 20 minutes or until the crust is golden brown.

- Once the gluten free pie shell has cooled, take the lemon cream filling from the fridge, and blitz in the Vitamix for a few seconds. Then pour the filling into the shell. Refrigerate overnight for best results.

- The next day, feel free to sprinkle a bit of icing sugar on top of your blender lemon cream pie or leave it plain.

- Cut a slice out and enjoy with your favourite breakfast er.. dessert drink.

All right, so there you have it! Vitamix blender lemon cream pie with a gluten free crust. Dan and I really ascribe to trying to make our kitchen tools multi-functional and using the blender this way definitely helps. Any high-powered blender that can blend until the inside heats up will work, the key part is to get the filling to the right temperature. I used to do a make-shift double-boiler by putting a glass bowl on top of a pot of simmering water but I usually ended up burning myself from the steam and the filling took significantly longer than seven minutes to make! Using the blender is not only faster but less chance of burning myself.
In case you were wondering if this was too sour for kids, this lemon cream pie was highly enjoyed by our friends' three kids, they loved the creamy lemony filling a lot! No one noticed that the crust was even gluten free. I do hope you enjoy making this pie tart as much as we have.


Comments
Post a Comment
I love when my friends and readers post comments. If you do try a recipe, let me know! I would love to hear from you! You can also contact me through twitter or Facebook.
Your comment will be visible after I have the chance to see it (due to the amount of spam).