Skip to main content
Cosmic Macarons - A recipe for marbled macarons
A Recipe for Cosmic Macarons

Hello! Ended up taking the month of August off from blogging; though I was still active over on my Instagram and Facebook media accounts. At the beginning of August, I spent a few days making Dan’s birthday cake. I’ll certainly blog more about that later, but for now here is a photo of his epic chocolate cake that I made for him! Isn't it awesome? This was my second time baking a cake!

Then, we spent about 2 weeks visiting family in Toronto, attending my cousin’s wedding (which happened to be the same venue that we got married in 6 years ago!), and visited Halifax for a few days. What a whirlwind trip! I'm having a wee bit of trouble adjusting back to a normal routine. So, lets start off my September post with my progress on macarons.
 I have been on a journey of making macarons for about 5 years now. Until recently, I have always made plain coloured macarons. After seeing other marbled macarons being made I wanted to try making these macarons with contrasting colours swirled across the shells. I blogged about my first attempt of making marbled macarons with a raspberry matcha filling. I really liked the colour that came out of this batch and called them Cosmic Macarons since they remind me of the cosmos. I filled these macarons with an earl grey buttercream.
 For this attempt of making marbled macarons, I used the single bag method. Last time, I separated each colour into its own bag, but this time I used only one bag for all the colours. For this method, I ended up making two separate batches of macaron batter. I split the egg whites evenly into two bowls after it was whipped. Then, I mixed each batter individually with the processed almond meal-icing sugar mixture and its respective gel food colouring. I then poured both batters into the same bowl before gently pouring the entire batter into the piping bag at the same time for a marbled look.
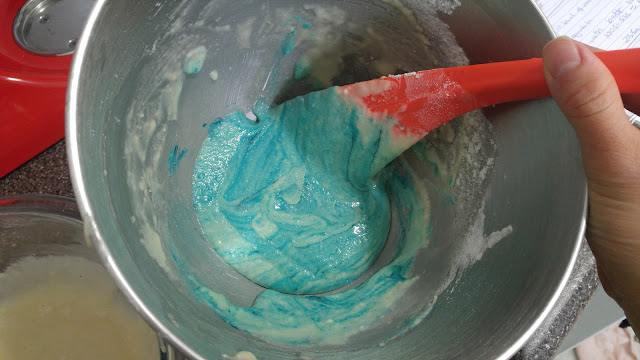

Ingredients for Cosmic Macarons
- 225g icing sugar
- 125g almond meal
- 100g egg whites (approx. egg whites from 3 large eggs)
- 5g albumen (dehydrated egg white powder)
- 28g extra fine/berry sugar (I process regular sugar in the food processor)
- Teal Wilton Gel colouring (2 drops)
- Delphinium Wilton Gel colouring (1 drop)

Equipment and Tools Needed
- Scale (one that measures to 5g minimum. The more accurate the better).
- Food processor
- Mesh sifter
- Stand up Mixer or hand held mixer
- Spatulas
- Piping bag fitted with a round piping tip. I use a wilton 2A.
- Silicon baking mats or parchment paper (I use 4 silicon mats)
- Heavy duty metal baking trays (I use four Commercial II baking trays that I got from Marshalls/Home Sense)
Directions:
- 2 days before making macarons, measure and age the egg whites. About 3-4 large eggs will give you 100g of egg whites. Keep the egg whites in an air tight container and leave at room temperature.
- Measure out all your ingredients for making the macaron shells using the scale. This helps to keep ingredients organized and easily accessible.
- Mix the berry sugar and albumen together in a small bowl and set aside.
- Prep silicon mats/parchment paper and set onto the heavy duty baking trays.
- Using a food processor, process the almond meal and icing sugar together. It should resemble a fine consistency. The smoother the mixture is, the smoother the shells will be.
- Weigh and measure the almond meal-icing sugar mixture and split in half. Place each half in separate bowls and set aside.
- Place a mesh sifter on top of a bow. Sift the almond meal icing sugar mixture through the sifter.
- Pour 100g of egg white into the bowl of a stand up mixer. Beat the egg whites at low speed.
- Once the egg whites are foamy (mousse like and have many fine bubbles), slowly add in the albumen-sugar mixture. Then turn up the mixer to medium speed (4 on the kitchen aid).
- Continue to beat the egg whites until "soft peaks" form. To check, stop and tilt the head of the kitchen aid back or stop and lift the tip of the whisk into the mixture to see if a small bird's beak forms. If you see a peak form, then you are done whisking the egg whites. Try not to whisk the egg whites until they are stiff or foamy. This is the "meringue" stage.
- Measure out half of the whipped egg whites into a separate bowl. Leave the other half in the mixer bowl.
- Take one of the separated bowls of almond meal-icing sugar mixture and sift it slowly into the whipped egg whites 1/4 cup at a time. Add two drops of teal gel colouring to the mixture.
- Mixing in a clockwise direction do the following:
- 1st part= 16 turns
- 2nd part = 11 turns
- 3rd part = 14 turns
- 4th part = 11 turns
- 5th part = 11 turns
- 6th part = 23 turns.
- Once the mixture feels and looks like magma (flows slowly), set aside.
- Do the same with the other half of the almond meal-icing sugar mixture and whipped egg whites. This time, add in the Delphinium gel food colouring.
- In a wide bowl, slowly transfer the teal batter to the bowl. Gently, push it to one side and add in the other batter.
- Slowly pour the entire batter (one half will be teal and the other side delphinium) into the piping bag.
- Pipe out small circles. Try to pipe down and then do a quick circular movement to the right to finish piping one shell.
- Pipe approximately 18-20 shells on each tray. How many shells you pipe on a tray will depend on how big you make each shell. Before piping the next sheet, firmly rap the tray on the counter to get rid of any air bubbles inside the shells. This is called "tamping".
- Use a toothpick to pop air bubbles on shells (this part is essential otherwise you get volcanoes instead of smooth macaron shells).
- Let macarons sit for at least 60 minutes until a skin forms and is dry to the touch (this is an important step)
- Preheat the oven to 280 degrees Fahrenheit. Allow the oven to come to the correct temperature. This may take 30 minutes. Using an oven thermometer is helpful.
- Bake one tray at a time for 18 minutes .
- Take the macarons out of oven and allow the shells to cool
- Once the shells cooled (about 15-20 minutes), gently peel the shells from the silicon mat (or parchment paper) and get them ready to fill with buttercream.

Earl Grey Buttercream Recipe
- 80g caster sugar (superfine sugar)
- 25g water
- 1 whole egg (~60g)
- 1 egg yolk
- 180g room temperature unsalted butter (cut into cubes)
- One tablespoon of double bergamot (Earl Grey) tea (finely processed)
Directions
- Measure all ingredients with a scale.
- Bring sugar and water to a boil in a small pot.
- Heat the sugar to 250F(120C). Allow the sugar to heat on its own.
- In another bowl or the bowl of your Kitchen Aid whisk the eggs and egg yolks until it lightens in colour.
- Once the hot sugar mixture reaches 250F pour immediately into the whisking egg mixture. Turning down the whisking speed temporarily will help prevent hot sugar threads from flying everywhere. However, once all the hot sugar is in, immediately increase to a higher whisking speed.
- Continue whisking until the mixture has cooled down completely. It will start to look like a meringue and be glossy. This is called the meringue
- Meanwhile in another bowl, cream then whisk the butter until it has thickened. It should also turn white in colour.
- Once the whisking meringue has cooled (about 20 minutes or until it decreases in temperature to 150F), slowly add the butter.
- Continue whisking until the butter cream is smooth.
- Add in the earl grey tea to the buttercream and whisk until the buttercream is smooth.
- Transfer the buttercream into a piping bag fitted with a round nozzle.
- Match all macaron shells by pairs (two shells that roughly the same in size).
- Pipe a tablespoon of butter cream onto each half shell.
- Top with the matching shell to finish the macaron.


Thoughts on using this Method for Making Marbled Macarons
This method of making the macarons was certainly more complex. Even though I thought I had evenly split all ingredients in half one batter ended up being denser. Also, measuring everything twice/separately resulted in double the work and took more time. I also found that after I mixed the almond meal-icing sugar into the egg whites for Batch A, I had to let it sit while I mixed Batch B. Macaron batter is finicky and from what I have learned you shouldn't be mixing the batter too much. Doing this method resulted in a lot of mixing. In the end, the macaron shells appeared to not rise as much as usual. Now, being even more particular, I am also convinced that each shell has a slight dip in it indicating that the batter was likely over-mixed or at least one of the batters was over mixed. I would also put more gel food colouring into the batter so that the shells will be brighter as they do lose a bit of their colour when they are baked in the oven. Overall, while the resulting macarons look great from a colour perspective, I won't be using this method next time to make marbled macarons. I will continue to blog my progress on marbled macarons in an upcoming blogpost.


A very thorough description of this diva of all pastries. I enjoyed reading about your Cosmic Macarons adventure - they are lovely!
ReplyDeleteYour macarons are always a pleasure to eat and they look beautiful. These new ones, the marbled, (as well as your "sunset" ones) are simply stunning! I have still have to attempt making them...we have to plan something ;-) .
ReplyDeleteSuch beautiful macarons - I love the marbled look!
ReplyDeleteStunning, It's been a while I got my hands dirty for macarons, your post is inspiring me to try again. Though can you please suggest why to weigh two days prior? Just want to understand the effect so when I try I know. Wish me luck:)
ReplyDeleteThank you for the inspiring post.
These look so fun! Macaroons are sure a pain in the bum to make, but they are so worth it when you see those beautiful feet forming!
ReplyDelete